Friday, March 28, 2014

Postcard - Easter Bunnies Stole the Eggs

I didn't plan to post this many postcards in a row, but it is tax season and I am married to a CPA.  It is also soccer season and my behind is logging some time on the bleachers watching my oldest boy play for his team.  And so, the time to take pics for the blog is escaping me, and I am left with sharing another postcard.  However, it is Easter time and these turn of the last century graphics are very lovely.


Thanks for stopping by the Tub!

Ellie

Postcard - Chicks and Violas

 Happy Friday!

I hope you don't mind the little chick 
Easter cards I've been sharing.
They're so cute!


I'm going to add some to a spring wreath I made, 
so wanted you to have them too.


Thanks for stopping by the Tub!

Ellie


Thursday, March 27, 2014

Postcard - Easter Chick

Here is another Easter postcard with a cute little chick.


Enjoy!

Ellie

Wednesday, March 26, 2014

Postcard - Easter Girl and Chick

I have some really cute Easter postcards 
I'll be sharing over the next weeks.
This is one of my favorites.


 It was never mailed, but is marked
March 27, 1910.


I really like it in blue toile.  So cute!
 

Thanks for stopping by the Tub!

Ellie

Sunday, March 23, 2014

$ Tree Candlesticks/Vases

I made these candlesticks for Valentines Day this year, but never got around to posting them.  You can find similar versions all over Pinterest and Blogland, so I didn't figure mine would be missed.


However, I've had a lot of fun using them in different ways so I thought I'd share an idea or two.

Spray painting the candlestick before gluing the pieces together with E6000 glue really added a nice touch of color.  I'm actually surprised how many ways I can use them in hot pink.  I think a red set is next on my list.

I love to use fillers I already have on hand like......dried peas, candy, moss, colored water, dirt.......and these colorful pony beads!  They remind me of jelly beans - which I think I will eventually replace them with.


Also, notice the hair bands I put around the base.  This is an easy way to add some fun color, but it also creates a great place to tuck a flower or glue something, since I really don't want to glue permanently to the glass.

For Valentines Day, I partially filled them with conversation hearts and a candle.  I think the egg is pretty cute for Easter, too.  My next idea is to see how they would look with Minnie Mouse cake pops for my grandbaby's birthday.  I think they could make adorable centerpieces!  When I get that far, I'll come back and post a pic.

Thanks for stopping by the Tub!

Ellie


Saturday, March 22, 2014

Tamale Pie

Need a recipe for dinner that is quick, easy, and makes great leftovers?  Give this Tamale Pie a try!


The friend who gave this recipe to me said it was from Pampered Chef. 

1 lb. Ground Beef (I use Turkey)
1 1/2 tsp. Garlic Powder
7 1/2 oz. Canned Tomatoes, crushed and drained 
          (or Rotel for more heat)
16 oz. Can Refried Beans
16 oz. Picante Sauce
8 3/4 oz. Can Whole Kernel Corn
1/2 C. Green Onions, sliced
1/4 tsp. Cumin
16 oz. Cornbread Mix, prepared (I have substituted Greek Yogurt for the eggs in the mix
           with very good results)
1 C. Shredded Cheese

In a large skillet, brown meat with garlic powder; drain.  In a large bowl, mix meat with remaining ingredients, except cornbread mix and cheese.

Spoon the meat mixture evenly into bottom of a 9 x 13 baking dish.  Fold cheese into prepared cornbread mix.  Top meat with cornbread and cheese mix.  Bake at 375 degrees for 30-35 minutes.  Let stand 10 minutes.  Serve with salsa and sour cream.


Wasn't that simple?  
You'll be surprised how easy, yet tasty this Tamale Pie is.

Thanks for stopping by the Tub!

Ellie


Friday, March 21, 2014

Pillows Made From Recycled Sweaters

I know this is nothing new, I just thought I would show you mine.


Oh, I love not throwing perfectly good things away.


This taupe sweater (below) was not tall enough, so I used 
pieces of the sleeve to stitch across the top. 


Lavender Tub Tips:  Make the pillows to fit tight since they have a lot of stretch.  This doesn't mean to stretch them out, but you might make a test pillow first to give you an idea how loose or tight it will fit before you cut several at once.

Also, when stitching the bottom opening closed, do a fairly loose hand stitch.  I stitched my first nice and tight like I normally would, but popped the stitches when I tugged on them to shape the pillow.

If you have a serger definitely use it.  
The pillows pieced together like a dream using my serger.


Thanks for stopping by the Tub!

Ellie

Thursday, March 20, 2014

Postcard - Birds and Flowers!!!

Happy First Day of Spring!!!


Where I live in Oklahoma our day started out below freezing, but the temps will be in the 70's before today is finished.
 

Such teasing and taunting........we want to be planting things, but the frost threat is still there.


And yet, who can help but enjoy a beautiful sunny day like today?


I think I shall go buy some plants anyway.


Thanks for stopping by the Tub!


Ellie


Wednesday, March 19, 2014

My Dad's Rabbit Tale

Have you seen this picture before?


Actually you haven't, because if you look closely 
you will notice a rabbit hidden in the rays of light.


When I was a young child my dad left his job in South Dakota, along with his means of providing for our family, to follow God's call into ministry.  He had avoided this call for 20 years, but God kept calling and patiently waiting.  About the time I finished kindergarten, my father finally answered God's call and moved our family 900 miles to Oklahoma so he could attend college.

Upon becoming a college student at a private religious school where there were no such things as night or on-line courses, my father had no choice but to work low paying, part-time jobs.  To say that we were poor would be a major understatement.

One evening when my mom had fixed corn meal mush for the 6th night in a row (like cream of wheat, only made from corn meal), my dad couldn't take it anymore.  He decided we needed a little meat to eat to keep us from feeling quite so hungry.  Having grown up on a farm in eastern Tennessee, he knew how to hunt squirrels and rabbits and decided to go see what he could find.  The only problem was - it was not hunting season.  He knew if he used his gun, the sheriff's deputy that lived 1/4 mile away would hear it and he'd be in big trouble.  Instead, he let out our two beagles to see what they might be able to trail.

Although he wasn't really sure how he would capture an animal, he set out after the baying beagles.  Within only a few minutes, the dogs stopped their baying and stood guard over a large rock waiting for their master to arrive.  How surprised my father was to find two, large, wild rabbits just sitting there, waiting for him to scoop them up in his hands.

For my father, this was a turning point moment in his life.  He no longer would doubt that God would provide for his family as he left behind material security to follow where God would take him.  This was one of many stories about God's provision he loved to tell to anyone who would listen.

After sharing this story with the people in his first church, a very lovely woman decided to paint this painting for my father.  It has always been important and extremely special to me, because as the oldest child - I remember the rabbits, I remember the wonderful lady named Annette, and I remember how much this painting meant to my dad.  How lucky I am to have it now hanging in my home.


I am also truly grateful Miss Annette chose to bless our family with her talents.  It very much inspires me to want to do the same for others.

Thanks for stopping by the Tub, and thanks for 
listening to my Dad's favorite rabbit tale!


Ellie


Monday, March 17, 2014

Olive Garden Gnocchi Soup - Ashley's Recipe


I have an amazing heart sister named Ashley, who I am missing like crazy.  Ashley moved away a couple of months ago and things are less sunny without her here.  She is such an amazing cook and this soup is just one of her specialties.  She blessed me a couple of times by inviting me over to share it with her and her precious little boys.  It is much yummier than Olive Garden's soup, and is my all-time favorite soup.


This recipe is from CopyKat Recipes.

1 T. Extra Virgin Olive Oil
4 T. Butter
4 T. Flour
1 Quart Half and Half
1/2 C. Celery, finely diced
1 C. Onion, finely diced
2 Garlic Cloves, minced
32 oz. Box of Chicken Broth
1 C. Carrots, finely shredded
1 C. Chicken, diced - use rotisserie for ease
1 Pkg. Gnocchi (I use mini)
   Look for it in the dried pasta section of your store
1 C. Fresh Spinach, coarsely chopped
1/2 t. Salt
1/2 t. Thyme
1/2 t. Parsley
1/4 t. Nutmeg

Cook gnocchi according to package directions, set aside.  Saute the onion, celery, and garlic in the butter and olive oil over medium heat until the onion becomes translucent.  Add the flour and make a roux.  Let the butter and flour mixture cook for a minute before adding 1 Qt. half and half.  Into the roux, add the carrots and chicken.  Once the mixture becomes thick, add the chicken broth.  When it thickens again, add the cooked gnocchi, spinach, and spices; simmer until soup is heated through.


If you happen to be reading this, Ashley, I treasure you and look forward to seeing you soon.  I thought of you the entire time I was cooking and wished you were here.  You are so loved!


Look how pretty it is to serve for Easter or in the autumn.

Thanks for stopping by the Tub!

Ellie

Sunday, March 16, 2014

Postcard - Turn of the Century Beauty

Here is a postcard that was mailed on August 12, 1908, of a real beauty.  The card says "Made in Germany" on the back, so perhaps she is a Fraulein.  


  She didn't look very good when I started, 


 but I think she cleaned up quite nicely.


How pretty!


Thanks for stopping by the Tub!

Ellie

Friday, March 14, 2014

PicMonkey - How to Combine Graphics for a Custom Design - Ballerina Picture

Today I'd like to show you how to take some free graphics that are available to you on the web, and combine them to make something unique and special.  I'm using 2 graphics that I downloaded from the Graphics Fairy to make a pretty picture to hang in a little girl's room.


When I open PicMonkey (see below), I am going to select Edit, and then choose the decorative frame graphic pictured above that is now saved to my computer.


Next, I'm going to click on the butterfly icon on the left, which allows me to add stickers to my picture


and I'm going to select Your Own at the very top.  While many of PicMonkey's features are free, this is one you will need to pay for, but it is awfully fun for the price.  I think it is only $5 to have all the upgrades for an entire month.


At this point I can now select any other picture I have saved on my computer to add to the picture I am editing.  I will now choose the ballerina.  (I did a little cropping and editing on this picture, and saved it back to my computer beforehand.)


Notice it is not blending very well, so I will now look to the pop-up editing box which automatically appears when you add a sticker (see it on the far right in the above pic).  Just click down through the Blend options to Darken, and that should blend your pictures together perfectly.


I finished this picture by adding an initial to the top.  All that is left is to save this back to my computer, giving it a new name.  It is ready to insert into Word or some other software to size and print it.

This is a great tool for making personalized invitations, cards, jewelry, gifts.....really the options are limitless!  Think you'll give this a try?  Let me know how it goes.

Thanks for stopping by the Tub!

Ellie

Thursday, March 13, 2014

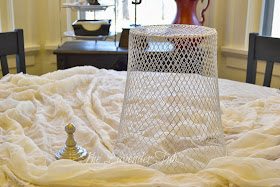
Fast, Fun, & Fabulous - Wire Cloche

Have you seen these Frenchy wire cloches that are so cute for decorating, especially for spring?  Wow, I thought I might like to have one until I looked at the price.  Ouch!!!


 So........how would you like to make one 
for a little over a buck?


I took my favorite crafting medium from the Dollar Tree, a little wire waste basket, and cut the bottom completely off of it.  Then I shaped and molded until it had a nice cloche shape.  Finally, I glued a bathroom knob hook to the top.  I picked this set up at a garage sale for next to nothing.


Isn't it adorable? 
 For a $52.50 savings - I'll take mine any day.
(There is not a hook hanging down inside - that is the S from the weather vane behind it)


I found that by using a table top and pressing my hand against the inside of the basket - it helped with the molding.  I shaped a second cloche by forming it around a glass cloche I already had.  I liked the glass cloche method the best, but perhaps not everyone has one to use as a form.
 

Thanks for stopping by the Tub!

Ellie


Tuesday, March 11, 2014

Postcard - Shirley Temple Girl

This postcard reminds me of Shirley Temple, doesn't it you?  It is not her, because this postcard was mailed on July 17, 1908, and Shirley Temple was not born until 1928.  It is so cute though.


If you use this design in any of your crafting, I would love for you to come back and share your idea.  I have to figure out something to make out of the creamy one!

Thanks for stopping by the Tub!

Ellie


Sewing/Cutting a Round Tablecloth

A while ago, I let you in on a secret of how you can use trash cans to make round tables in your home.  You can see that post here.  Today I'd like to show you an easy way to make a round tablecloth for that table, or any other round table you may have.

 
 Step 1.  You will first need to measure the width of the top of your round table.  Next, measure from the top edge to the floor, or however long you want the tablecloth to hang.  Finally, decide how you will finish the edge of the tablecloth.  Will you stitch lace to the edge, serge it, do a rolled hem,  or apply No-fray?  To determine your CUTTING LENGTH:  Add together the width of the top + the drop (length) x 2 + how much you need to hem (If rolled hem - add 1/2 inch, if serging - add 1/4 inch) x 2.

If you have a wide enough piece of fabric, like a sheet, go ahead and skip to Step 4.

Step 2.  Most fabrics are not wide enough for round tablecloths, which means you have to piece them.  To know how much fabric to purchase - take the cutting length you figured above and multiply times 2.  To cut my fabric for piecing, I simply fold the big piece of fabric in half matching up the top and bottom, and cut on the fold.  Then I fold one of those pieces in half lengthwise, and cut on that fold.  You should now have a large rectangle and two strips the same length as the rectangle, but half the width of it.  


Step 3.  I fold each piece of fabric in half width-wise enough to find my center point and start pinning the pieces, right sides together, from the center out. 


Stitch into place.  Open the seams and press nice and flat. 
(In my example, my strips are slightly shorter, but just a 
little and it will not alter the outcome.)
 

Step 4.  Fold the pieced fabric in half lengthwise, matching up the seams and the edges.  Now fold in half the other way, so the top and the bottom of the fabric are lined up.  I like to pin around the edge to keep everything from slipping.  


Step 5.  If you can work on a surface where you can stick a pin into it - that would be great.  My hard wood floors have little gaps between the planks and work perfect for me.  I've marked which corner you will want to stick the pin in.


Step 6.  If your tape is like mine and has a little nail hole, go ahead and measure from the edge of the nail hole to the flat metal edge of the tape measure (probably about 1/4").  Add this small amount to 1/2 your CUTTING LENGTH that you determined in Step 1.  If yours does not have this hole, just use 1/2 your CUTTING LENGTH.  Poke a stick pin into the center of the tape measure at the place that is 1/2 your CUTTING LENGTH plus the 1/4" - if you have a hole.  Now poke the pin through the folded top corner of your fabric and into your surface - if you can.


Step 7.  Put a pen or pencil through the hole of your tape measure, and carefully draw a curved line onto your fabric.  Your tape measure will pivot  on the pin at the top.  Take your time and don't pull on the tape measure, but rather use gentle tension and glide your marking.


Step 8.  Cut through all 4 thicknesses of fabric on the curved line.  When you open your fabric after cutting, you should have a nice, big circle.  Simply finish the edge of the circle with whatever method of hem you decided on, and you are finished!


It really is super easy and very satisfying to make a beautiful round tablecloth in your favorite fabric.  Start with a large sheet and give it a try.  If you do go for piecing the fabric, I would recommend you stay with a plain fabric until you get the hang of piecing fabric and are ready to move on to matching up designs.

Who is going to give this a try?

Thanks for stopping by the Tub!

Ellie