Tuesday, June 26, 2012

Yummy Brown Basmati Rice - You Have To Try This

If you're trying to add whole grains to your diet, brown basmati rice is an excellent choice to consider.  It has more amino acids and essential nutrients than any other rice, and in my honest opinion - it is the most delicious of the brown rices.  One cup of cooked brown basmati rice also supplies 10% of your RDA of protein in case you're trying to cut back on the amount of meat you eat but are concerned about getting enough protein.  To learn even more benefits, click here.


I found this method of cooking brown basmati rice several years ago on the internet, but I have no idea where.  I wrote it down on a scrap of paper, therefore I am unable to give credit where credit is due.  So to whoever you are that shared this cooking method - Thank You!  It is easy, quick, 
and wonderful.

The amounts given are for EACH cup of uncooked rice.
  I used 2 cups, which yielded 5 cups of cooked rice.


Heat 1/4 tsp. of oil in a saucepan.


Saute the rice in the oil until it smells like popcorn 
and is making sounds like Rice Krispies after you 
add milk to them.  This should take about 5 minutes.  
Stir continuously so the rice does not burn.


Turn off the heat and slowly add 1.5 cups of water.


Cover the sauce pan and bring the rice to a boil.
Turn the heat off and let sit for 5 minutes.
Turn the heat back on and bring to a boil again.
Finally, lower the heat to simmer and cook 
with the lid on for about 27 minutes.


Fluff with a fork and enjoy.  Your rice should be tender, yet chewy, nutty, hearty, and flavorful.  It is good enough to eat with just a little salt and pepper, but here are some other yummy topping ideas:

Everything you would put on oatmeal
Salsa
Gravy or Chicken Broth
Sauteed onions and garlic
Anything Chinese, Mexican, Thai and so on

We're kind of on a healthy eating kick around here right now - I hope you don't mind coming along for the ride.  It has taken a while to get Edward to come to the dark green side, so I'm seizing the day!

Oh, I almost forgot - I purchase brown basmati rice in bulk at the health food store.

Until next time,

Ellie

Monday, June 25, 2012

I Can Hear Your Sweet Voice Calling....

I can't remember when we last had a vacation.......

No, seriously - without digging through pictures, I cannot recall the last vacation our family was able to take together.  We had a destination wedding a few years back, but it has been a while since we've taken a vacation.  Due to the economic lay-offs of a couple of years ago, including my husband, vacations kind of fell off the horizon.  But not this year!!!


Edward worked a long tax season this spring which allowed us to have some extra funds for spoiling the kids.  This makes me so happy!  Would you believe their vacation of choice was Galveston, TX, to spend some time at the beach?  You mean no long lines to ride rides, no walking your legs off, no dying of heat stroke.......YES! YES! and More YES!!!


Our eldest son even took the initiative to look up hotels and choose the place he thought we should stay.  He chose the San Luis Resort located right on the beach, and it turned out to be an amazing place to reside.  I can't believe how much we enjoyed sitting on the balcony to our room and just enjoying the ocean breezes.


Of course, we also immensely enjoyed the beach.


The waves were crazy fun to play in, and the water and air temps were perfect.  These are my men diving into the waves.


When the salt, sand, and wind were too much, we still had this lovely pool to relax in.


The sunset was beyond beautiful.


Such a precious time with Edward and our sons.  You know, when you wait for something for a long while - it seems especially delicious when the time for indulgence finally arrives.

Thank you, God, for the wonderful blessing of this vacation!

And Thank you for stopping by!  It's so nice to see you again.

Ellie 


Thursday, June 14, 2012

40 Cups of Spaghetti Sauce

One of the main reasons I write this blog is because I have several young ladies in my life who are learning how to manage their homes, and some of them have asked me for tips in knowing how to do this.  I am certainly not an expert, but I've learned a few things here and there - and my thinking is "Why re-create the wheel?"  I think they are very wise to ask others for help, and I'm thrilled if they think I have something to offer.

Here are a few of my younger friends the morning after a slumber party at my house.  They look tired because no one slept all night.  
Oh how I love these girlies!


A favorite house management skill that I've learned over time is to cook in bulk. I'm really not one of those persons who cooks for three days and then has all of their meals ready for a month - although I admire them greatly.  I'm really more of a - "I think I'll triple or quadruple dinner to keep myself from having to cook 3-4 times in the future" kind of girl.  This works better for me because I purchase meat by the whole steer, and I don't want to thaw meat, cook it, and then refreeze it.  I also like to use fruits and veggies that are in season, so partial bulk cooking works best for me.


This sauce recipe has been evolving in my kitchen for many years and is now, by far, our family's favorite spaghetti sauce. Since I don't want to be in the kitchen making it all the time, I prepare it in very large batches and try to always have some in the freezer.  It really doesn't take much extra effort to 7 times it than it does to make a single batch - so I do.  I also like that when I make it in bulk, I can cut down on some of the oil and sugar, and still get the same flavor.  It's also much cheaper to do it this way because bulk cans of tomato sauce and paste are less expensive per ounce than smaller cans.


 Ingredients:

2  106 oz. Cans Tomato Sauce
6 Cups Tomato Paste
1 Cup Olive Oil
7 Cups Diced Onions
1/3 Cup Minced Garlic
9 Cups Water (or more if necessary)
1/3 Cup + 2 Tbs. Dried Oregano
2 Tbs. Dried Basil
5 Bay Leaves
1/4 Cup Sugar
2 Tbs. Salt
1/2 Tbs. Pepper

I use this blade on my food processor to chop onions.  
I actually run them through twice on this blade.  
It makes quick work and seems to cut down on the tears.

This is how they turn out using that method.

To peel garlic, hit the palm of your hand against the side of your 
knife blade as it rests on a clove of garlic.  This smashes 
the clove a bit and the skin easily peels off.

Then toss all the peeled cloves into a small food processor 
and pulse until the garlic is minced.

In a large skillet, heat 1/2 the oil and cook 1/2 the onions over moderate heat, stirring for about 8 minutes or until the onions are soft and transparent, but not browned. Transfer the onions to a large roaster pan.  Repeat with the rest of the oil and onions, but this time add all the garlic to the cooking onions when they've cooked for about 7-8 minutes. Cook the onions and garlic together for 1 minute stirring constantly.  Add to the onions already in the roaster pan.


Add all of the other ingredients to the roaster pan and stir well.  I like to pinch and twist the oregano and basil in my fingers before I add in order to release the natural oils in the dried spices.  Leave the bay leaves whole.  Bring the sauce to a boil then turn the heat to low and allow to simmer for at least an hour.  After an hour, remove the bay leaves since they will continue to get stronger.  You could continue to simmer the sauce at this point, or you could let cool so that you can package and freeze it.  I freeze in 24 oz. packages because that is the size that works best for 1 meal for my family without leftovers.


The cost for this large batch is around $10.  Honestly, you can buy about the same amount of Ragu if you have coupons and sales prices for about $10.  In addition, the ingredients in Ragu are not that bad, although it appears there is quite a bit more sugar.  Of course it also takes longer to make this recipe than it does to open a jar of store sauce.  However when it comes to taste - no comparison!  You should hear my family complain when I run out of the good stuff and serve store-bought jar sauce for supper.

I pinch one of my large cans like this and ladle sauce into it.  
This is an easy and less messy way to pour the sauce into the freezer bags.

The way I look at it, by making this large batch I just bought myself 13 meals out of the kitchen.  Sure, I (or the kids) still need to prepare some noodles and maybe a salad, but the sauce is ready and just needs to be pulled out of the freezer and thawed.......which means I have a little time to catch up on some painting - or write a blog post Woo-Hoo!


How do you get tasty, healthy meals on the table without chaining yourself to the kitchen everyday?  Like my younger friends, I'm always looking for ways to work smarter and not harder.

Hey, thanks for stopping by again.  Love ya.

Ellie

Wednesday, June 13, 2012

Gazpacho

Sooooo.......have you noticed it is summer?  I didn't realize it was going to be this busy, but I guess I should have considering we still have a 14 and 16 year old at home.  In addition to keeping up with their activities, in the last month we have painted and are redecorating several rooms in our house, have dealt with a plumbing hiccup, have hosted 2 gatherings in our home, spent time with friends from Africa, watched NBA basketball games because we live about 40 minutes from Oklahoma City - Home of the OKC Thunder (who are in the NBA finals as we speak)....... and then there is my sweet grandbaby to visit as often as I can.  


As if that were not enough - my dear hubby, Edward, was compelled to watch the documentary Forks Over Knives and decided he might actually try to eat vegetables really for the first time in his life.  I'm a big veggie/healthy eater, but I must admit I've let myself go to the dark side the last few years, because I grew tired of cooking different foods for different members of the family.  It was easier to give up than to keep throwing good food away when no one, but me, wanted to eat it.  Also when Edward lost his job, it was cheaper to buy junky stuff than to keep fresh food on hand.  I can't even begin to tell you how thrilled I am that Edward is seeing the importance of healthy eating and trying to make some changes in his diet.  It certainly has renewed my enthusiasm, so I've been spending extra time in the kitchen preparing meals with many more plant ingredients and fewer animal based ingredients.  And while I really have been a little too busy to sit down at the computer and write much, I've been taking pictures all along the way and am excited to share the changes going on around here.

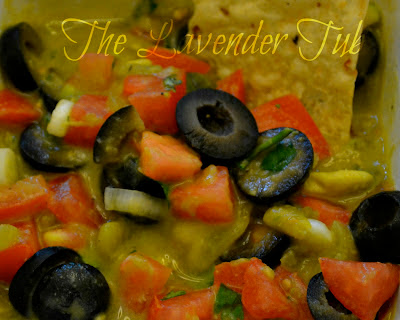
So, where does the Gazpacho come in?  Well, if you have never had Gazpacho or do not know what it is - it is a veggie based cold soup.  The ingredients for it are quite varied from recipe to recipe, so beyond its definition of being a cold veggie soup, there really is not ONE taste associated with it.

This Gazpacho recipe is from a friend who serves it with corn chips, so it is more like a salsa.  It is wonderful to eat just as a salad, or soup, but it is also delicious on top of grilled chicken breast.  Regardless of how you eat it, I hope you will give it a try.  It really is a satisfying veggie dish, and it is chocked full of good nutrients.


Gazpacho

Ingredients:

1-3 Tbs. Olive Oil
1 1/2 Tbs. Cider Vinegar
1 tsp. Salt
1 tsp. Fresh Garlic, pressed
1/2 tsp. Black Pepper
1  4 oz. Can Sliced Black Olives
1  4 oz. Can Green Chilies
4-5 Roma Tomatoes, diced (or use any variety)
4-5 Green Onions, chopped
1/4 - 1/2 C. Cilantro, chopped
1 Avocado, diced
Serrano Chili Peppers, if desired for heat

Blend together the oil, vinegar, salt, and pepper.  Mix in the vegetables.  That's it!  Eat and Enjoy!  Of course it is very forgiving, so add whatever ingredients and amounts that appeal to you.

If you need a little motivation to eat healthier, Forks Over Knives will certainly make you think.  We downloaded a copy to watch from Amazon.

If you make Gazpacho - I'd love to hear what ingredients you use.  I need all the ideas I can get.  Also, have you seen Forks Over Knives?  What did you think?

Thanks for stopping by,

Ellie

Tuesday, June 5, 2012

Sopapilla Cheesecake and Annual Block Party

This past Sunday, we hosted our 
12th Annual Block Party!!! 


 When we first moved to our neighborhood, 
we wanted to get to know our neighbors

So we walked around our neighborhood 
handing out invitations,


Put in a request for the city to barricade 
the street next to our house


And they came!

I really do have the best neighbors in the world!


How sad it would be to have 
missed knowing them.


Life is too short to not share it 
with the people you live closest to.

This is one of the recipes I made for dessert


One of my neighbors asked for the recipe, 
so here it is for her - and you.


Sopapilla Cheesecake (slightly altered from AllRecipes.com)


Ingredients:


2-8 oz. Packages Cream Cheese, room temp.
1 Cup White Sugar
1 tsp. Mexican Vanilla
2-8 oz. cans Crescent Rolls


If you prefer more cheese cake filling- increase the cream cheese to 3 packages, the sugar to 1 1/2 cups and the vanilla to 1 1/2 tsp.

Topping


2/3 Cup White Sugar
1 tsp Cinnamon
6 Tbs. Butter, room temp.


Honey


Preheat oven to 350* F.  Spray a 9 x 13 pan with cooking spray.  Beat the cream cheese, sugar, and vanilla until smooth. Unroll 1 can of crescent rolls and press into the bottom of the 9 x 13 pan.  Spread the cream cheese mixture on top of the rolls.  Unroll the 2nd can of crescent rolls and pinch the seams shut.  Place this on top of the cream cheese layer.

Mix together the ingredients for the topping.  Dot this mixture on top of the cheesecake.  Bake for about 30 minutes, or until the dough has puffed and turned golden brown.  Drizzle with honey, if desired.  Cool completely before cutting.


It is just wrong that it is sooo yummy!

If you don't know your neighbors, 
consider hosting a block party.
I bet you have the best neighbors in the world, too!

Thanks for stopping by,

Ellie

P.S.  We also have the block party the weekend after Memorial Day.  Most people are back in town and the weather has always been perfect.