Showing posts with label Holiday. Show all posts

Friday, January 30, 2015

Yummy, Crunchy, Easy Microwave Peanut Brittle


Peanut brittle can be a tricky candy to make.  If you don't cook it long enough, it is so gooey it can almost pull your teeth out.  If you overcook it, the sugar and peanuts burn and it tastes awful.  I think most people just purchase peanut brittle when they are hungry for it, rather than go through all that hassle.

But what if you could make it hassle free?  My mom had a great microwave recipe that turned out perfect peanut brittle every time - for her.  For me.......not so much.  As the years have passed, microwave times and temps have changed, and so her recipe did not work with modern models.  I'm happy to say that after many trial and error batches - I can share a recipe that I think will give you wonderful results each time you make it.

I use a large, 8 Cup, heavy, glass bowl to cook my peanut brittle.  It gets very hot and it is helpful to see the color, so I would recommend something similar.

1      Cup Granulated White Sugar
1/8   tsp. Salt
1/2   Cup Light Corn Syrup
1      Cup Raw Peanuts
1      tsp. Butter
1      tsp. Vanilla
1      tsp. Baking Soda

Butter a baking sheet and set aside.  Mix together the white sugar, salt, and light corn syrup.  Microwave on High for 2 minutes.  (All the microwave times are on High.)  Stir in the cup of peanuts, then microwave for 3 minutes.  Stir in the butter and vanilla, and microwave on 1 1/2 minutes; stir, then microwave for 1 additional minute.  Add the teaspoon of baking soda and GENTLY stir until light and foamy.  Immediately pour the mixture onto the greased baking sheet and quickly spread it a bit.  Let it cool completely, then break it apart.  The back of a soup spoon does a nice job for breaking.

Think you want to try this recipe?  It turns out so yummy, and there are no candy thermometers, no endless stirring on the stove top, no plunging spoons into cold water........and no guesswork.  It's such delicious peanut brittle, I know you're going to want to make it for more holidays than just Christmas.


Thursday, January 15, 2015

My Family's Favorite Cheese Ball

  
I honestly can't believe I've never shared this recipe on the blog before, because it is one of my most requested recipes 

- for 2 reasons:

            #1  It really is one of the best cheese ball 
recipes around

and 

            #2  Family members can't seem to find their 
                  copies of the recipe at Christmas time!

The conversation always goes, "Hey, I just did a search on 
your blog......and I can't find The Cheese Ball Recipe......

So, if for no one but my family - Here It Is!

1 pound Cheddar Cheese, shredded
2 - 8 oz. packages Cream Cheese, room temp is best
2 tsp. Garlic Powder
2 tsp. Worcestershire Sauce
1/4 - 1/2 Cup Mayo (I lean toward the 1/4 Cup)
Chopped Pecans (about 1/2 Cup)
Chili Powder

Combine the cheeses, garlic powder, Worcestershire sauce, and mayo.  Mix well with your hands.  Shape into a ball, Christmas tree, heart, log, or whatever your mood dictates.

On a piece of plastic wrap spread the pecans and sprinkle chili powder over them.  (You can mix some pecans into the cheese mixture, but I just coat the cheese ball with them in case someone does not like pecans.)  Now, just roll the cheese ball around on the pecans and chili powder until it is completely coated.  I usually finish off with some extra chili powder.


Lavender Tub Tip:  I hang on to the plastic wrap with the pecans and chili powder.  If the cheese ball is not consumed in one sitting,  I can always reshape and roll it again.  Sometimes I use the leftover cheese ball in a pan of enchilada casserole - just break it into small pieces and use in place of the shredded cheese.  It tastes wonderful.

Lastly, if you are watching your carbs, this makes a super yummy treat when eaten with almonds.  It really hits the spot when you need something snacky.

I hope your family enjoys this recipe as much as ours does!  At least my family can all pull it up on our phones now!


Thursday, October 23, 2014

Cropping Pictures for Ornaments or Jewelry - PicMonkey

Christmas is just around the corner, and I'm already in the mood to put up a tree!!!

Darn that Hobby Lobby!
They put Christmas stuff out so early - 
who can help themselves?

Truthfully, I think one of the reasons I'm so excited is I get to add a 2nd sweet grand baby's face to my tree.  I didn't used to decorate much with those kinds of ornaments, but when you have grand babies as cute as mine - it's a must!


See what I mean?
This handsome man joined our
family in July of this year.

Here is a quick, little tutorial to help you get a nicely cropped, quality picture that will look great in your ornament, piece of jewelry, or tiny frame:

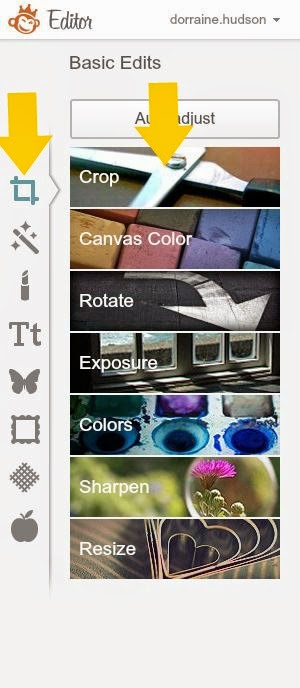
Go to PicMonkey.com and click the Edit button.  (PicMonkey is a photo editing site that has tons of cool edits for FREE!)  When you click Edit, places you store pictures on your computer will pop up, and you just need to select the picture you wish to edit.

Once you have your picture pulled up in PicMonkey, click the Crop button on the left.


Within the Crop function, you will click on the little drop-down menu and select "how" you wish to crop your picture.  For my application I'm choosing a Square.  As soon as you click Square - a square highlight will pop up on your picture.  You can now drag this anywhere on your picture to frame what you want included in the crop.  You can also adjust the size by grabbing one of the corners and sliding it.  When you are happy with the size and position, Click Apply.


This will leave you with a wonderfully squared picture.  All you need to do now is Save it back to your computer with a new name.


To print the picture, open Word (or some other word processing software), and create a New Document.  Click on Insert, then select Picture - and choose your newly created picture from where you stored it on your computer.  When you hit Enter, your picture will appear in the document.  The last step is to go over to the right of your screen and enter the dimensions you need your picture to be.  If it is an inch - use 1.0   If a half inch - then .5   All that is left is to print your picture and cut it out!


Wasn't that easy?

If you need a circle for your ornament or jewelry - I made a tutorial for that here.

This little lion is my beautiful grand daughter about 2 years ago.  Don't you agree that my tree will look much sweeter with these two precious babies lighting up its branches?


Tuesday, September 30, 2014

Spooky Welcome Sign - Printable

One day this past spring I heard quite a commotion in my yard.  When I went to investigate, I found dozens and dozens of birds squawking and carrying on.  It really was kind of like a scene from The Birds, and kind of gave me the eebie jeebies.


I'm much more about pretty fall decorations this time of year than all the gory stuff, but there is something kind of enticing about old, creepy houses.  When I saw this image on The Graphics Fairy's site - I thought it would be fun to marry it with my bird picture to make a spooky Welcome sign.  To see this image on her site, go here.
 
 
I took the color out of my bird picture and heightened the contrast quite a bit.  Then I overlapped it onto the Graphics Fairy image, and finally added some texture.


You're welcome to print one for yourself, if you like.  And please stop by anytime - pay no attention to my little welcoming party at the front gate.  I think they'll let you enter......
 

Friday, September 26, 2014

Simplified Decorating With Glass Displays

I Looooove to decorate.  I do!  
Especially for all the different seasons.  


However, I'm learning that my decorating style is simplifying and changing.  I find that I'm not as interested in spending an entire week getting out the new season's decor and packing up the previous season to stack in the garage.  I seem to be migrating towards things I can change up in short time that still look fantastic for the season.  


One reason I've been posting about apothecary jars/cloches of late, see here, here, and here, is because it's a great way to pull off this simplified approach.


By gathering and making a very eclectic collection of glass displays, I can update my decor for the season just by changing what's inside.


It's fun, too, because if I don't have enough variety for all the different displays, I can just walk around my yard and pull a bit of what's happening outside - inside.


I think it keeps the decorating a little fresher as I'm not just getting out all the same stuff I've used year after year.


Of course I have favorite pieces I want to hang on to and continue to use, but it does force some new and interesting combinations.


And should I decide to have some friends over for a little tea, I can replace a few decor items with some cookies or cupcakes, keep some of the decor in place - and have a special little dessert buffet.


If you decorate for the different holidays, do you like a simplified approach, or is part of the enjoyment spending several days getting your house all pretty?


Tuesday, September 9, 2014

Personalized Carved Pumpkins

Would you like to carve some pumpkins that are personalized to your family?  Here's an idea for making a pattern with a little help from Picmonkey.


Take or find a picture of the person you wish to carve on a pumpkin.  I used this picture of my son wearing my sunglasses.  (He will be so thrilled!)

 
In the case of this picture, I cropped and edited out everything I didn't want in the background.  To crop in Picmonkey, select the top icon on the left, and then choose CROP.


To create the pumpkin pattern - select the Magic Wand icon on the left, and scroll down until you find POSTERIZE.  You will only want to use 2 colors, and probably slide the Details Bar until you get the look you want.


You should get a picture that looks something like this!  Isn't that cool?


All you need to do now is save your picture to your computer.  To print the pattern - insert your saved picture into a Word document and adjust the size.  Trace the design onto your pumpkin, and shave away all the white areas of the picture.


This is just a mock-up, but it gives you an idea of what your carved pumpkin would look like.

Wouldn't it be fun to use pictures of your kids with crossed eyes or sticking out their tongues?  Just remember to keep it simple, or you'll be carving forever and writing icky comments to me!

Lavender Tub Tips:  When taking the pictures - try to use a plain white background with really good lighting.  You want strong contrast in your pic.  If it is not turning out the best on the POSTERIZE - you might need to play with it by going Black and White, or upping the contrast.  Each picture I've tried has been a little different, so you might need to play with it a bit.


Sunday, September 7, 2014

Happy Autumn Y'all - 8x10 Printable


I put together a little Autumn printable.  If you'd like to print it - just save it to your computer, open a Word document, insert the pic from your computer and then adjust the size to 8x10.


Saturday, August 30, 2014

Family Message Board With Cork And Chicken Wire

See this handsome kid?


Well......he is mine.  Would you believe this darned kid grew up, and we moved him to college about 2 weeks ago?  Honestly, this is the first I've been able to say anything about it because I've been kind of sad.  No......I really, truly have.  But, I'm adjusting.  Since he is living in a campus apartment and left his bedroom completely empty, we have been switching rooms around.  The silver lining - I now have 
a studio of my own to put all my machines and messes in!  Woot!  Woot! 
   
I'll show you pics of it when I get finished, but for today - I told you all of that so that I could get to this:  I stole our big message board for my new studio - so now we need another for the family.  LOL!  Here is what I came up with:


I took a frame, cut an old piece of white marker board to fit, turned it around, spray painted the back, glued a cork tile on the top, added chicken wire (for hooks and magnets), and..........voila!


I also added scrapbook paper painted with a chalk board medium (see my post here to learn more) to the cork tile.  It is only tacked on so I can change it with the seasons.


Since it is smaller than the one I stole, I can put it in a more convenient place.  I think everyone will see it here.  It works! 


Wednesday, August 13, 2014

Glass Knobs To Create Baubled Glass Cloches

A collection of glass cloches, apothecary jars, and cake domes is a gorgeous way to decorate.  Not only does everything looks prettier under glass, but I have to say - having 
a collection lets you change out your seasonal decor without having to box up lots of tchotchkes, only to unpack others.  Simply change out leaves for Christmas ornaments, or ornaments for eggs and your decorating is done.

But glass cloches can be expensive and hard to find!  So, today I have a few fun tips to help you make some by adding glass baubles to found objects.  This is also a great way to replace knobs on your pretties that might have been broken off.

But where do you get the glass baubles to add?

For this first tip:


Hold a plastic gem in a flame for a few seconds, then press the gem on a piece of tile or some other surface that won't be harmed.  


This will flatten the point, giving you a broader surface to glue onto a cloche or lid.  I use E6000 glue for these embellishments, and it seems to hold quite well.

 Here is an example:


Also, I bought this set of 2 apothecary jars at Goodwill, but didn't realize the smaller one was missing its swirly handle.  Although it doesn't match, the glass gem still adds a finished look and it isn't too noticeable.  Well, not until now -  
my secret is out.


I love this next bauble idea:

Pick up plastic/glass knobs when you see them for a good price.  I see this style at garage sales all the time.  Heat the metal part of the knob with a lighter for 15-20  seconds, then using pliers - twist and pull the metal off.  


Don't they make beautiful, sparkly baubles?


Lastly, just keep your eyes open for orphaned, unusual knobs when you're out and about.  I found this one at Hobby Lobby for 60 cents.  I have no idea what it was for, but it is my favorite addition of all. 


A little extra sparkle is always in order, don't you think?
 I sure do!