Showing posts with label PicMonkey. Show all posts

Thursday, October 23, 2014

Cropping Pictures for Ornaments or Jewelry - PicMonkey

Christmas is just around the corner, and I'm already in the mood to put up a tree!!!

Darn that Hobby Lobby!
They put Christmas stuff out so early - 
who can help themselves?

Truthfully, I think one of the reasons I'm so excited is I get to add a 2nd sweet grand baby's face to my tree.  I didn't used to decorate much with those kinds of ornaments, but when you have grand babies as cute as mine - it's a must!


See what I mean?
This handsome man joined our
family in July of this year.

Here is a quick, little tutorial to help you get a nicely cropped, quality picture that will look great in your ornament, piece of jewelry, or tiny frame:

Go to PicMonkey.com and click the Edit button.  (PicMonkey is a photo editing site that has tons of cool edits for FREE!)  When you click Edit, places you store pictures on your computer will pop up, and you just need to select the picture you wish to edit.

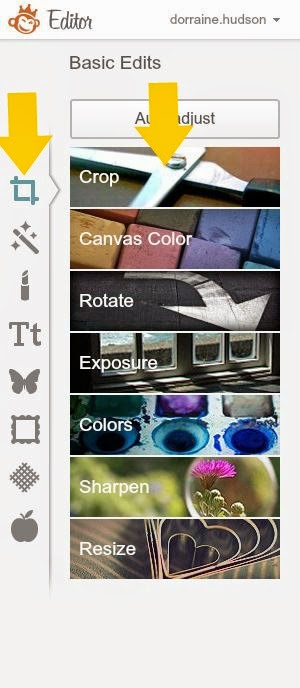
Once you have your picture pulled up in PicMonkey, click the Crop button on the left.


Within the Crop function, you will click on the little drop-down menu and select "how" you wish to crop your picture.  For my application I'm choosing a Square.  As soon as you click Square - a square highlight will pop up on your picture.  You can now drag this anywhere on your picture to frame what you want included in the crop.  You can also adjust the size by grabbing one of the corners and sliding it.  When you are happy with the size and position, Click Apply.


This will leave you with a wonderfully squared picture.  All you need to do now is Save it back to your computer with a new name.


To print the picture, open Word (or some other word processing software), and create a New Document.  Click on Insert, then select Picture - and choose your newly created picture from where you stored it on your computer.  When you hit Enter, your picture will appear in the document.  The last step is to go over to the right of your screen and enter the dimensions you need your picture to be.  If it is an inch - use 1.0   If a half inch - then .5   All that is left is to print your picture and cut it out!


Wasn't that easy?

If you need a circle for your ornament or jewelry - I made a tutorial for that here.

This little lion is my beautiful grand daughter about 2 years ago.  Don't you agree that my tree will look much sweeter with these two precious babies lighting up its branches?


Tuesday, September 30, 2014

Spooky Welcome Sign - Printable

One day this past spring I heard quite a commotion in my yard.  When I went to investigate, I found dozens and dozens of birds squawking and carrying on.  It really was kind of like a scene from The Birds, and kind of gave me the eebie jeebies.


I'm much more about pretty fall decorations this time of year than all the gory stuff, but there is something kind of enticing about old, creepy houses.  When I saw this image on The Graphics Fairy's site - I thought it would be fun to marry it with my bird picture to make a spooky Welcome sign.  To see this image on her site, go here.
 
 
I took the color out of my bird picture and heightened the contrast quite a bit.  Then I overlapped it onto the Graphics Fairy image, and finally added some texture.


You're welcome to print one for yourself, if you like.  And please stop by anytime - pay no attention to my little welcoming party at the front gate.  I think they'll let you enter......
 

Tuesday, September 9, 2014

Personalized Carved Pumpkins

Would you like to carve some pumpkins that are personalized to your family?  Here's an idea for making a pattern with a little help from Picmonkey.


Take or find a picture of the person you wish to carve on a pumpkin.  I used this picture of my son wearing my sunglasses.  (He will be so thrilled!)

 
In the case of this picture, I cropped and edited out everything I didn't want in the background.  To crop in Picmonkey, select the top icon on the left, and then choose CROP.


To create the pumpkin pattern - select the Magic Wand icon on the left, and scroll down until you find POSTERIZE.  You will only want to use 2 colors, and probably slide the Details Bar until you get the look you want.


You should get a picture that looks something like this!  Isn't that cool?


All you need to do now is save your picture to your computer.  To print the pattern - insert your saved picture into a Word document and adjust the size.  Trace the design onto your pumpkin, and shave away all the white areas of the picture.


This is just a mock-up, but it gives you an idea of what your carved pumpkin would look like.

Wouldn't it be fun to use pictures of your kids with crossed eyes or sticking out their tongues?  Just remember to keep it simple, or you'll be carving forever and writing icky comments to me!

Lavender Tub Tips:  When taking the pictures - try to use a plain white background with really good lighting.  You want strong contrast in your pic.  If it is not turning out the best on the POSTERIZE - you might need to play with it by going Black and White, or upping the contrast.  Each picture I've tried has been a little different, so you might need to play with it a bit.


Sunday, August 24, 2014

Love Gives Us A Fairytale - 8 x 10 Printable

I saw this quote on a stamp at Hobby Lobby last week and decided I wanted to frame it.  If you would like to frame this also, just click on the picture and save it to your computer.  Then you can go into Word, insert a picture into your document, enlarge it - and print.  


 You can also go to www.picmonkey.com and pull it up to edit it.  If you click on the magic wand icon on the left and then select TINT - you can actually change its color to fit your decor.


Or perhaps you might like to select OMBRE and have a sign that looks more like this.  Just be sure to save it back to your computer with a new name.


Enjoy!